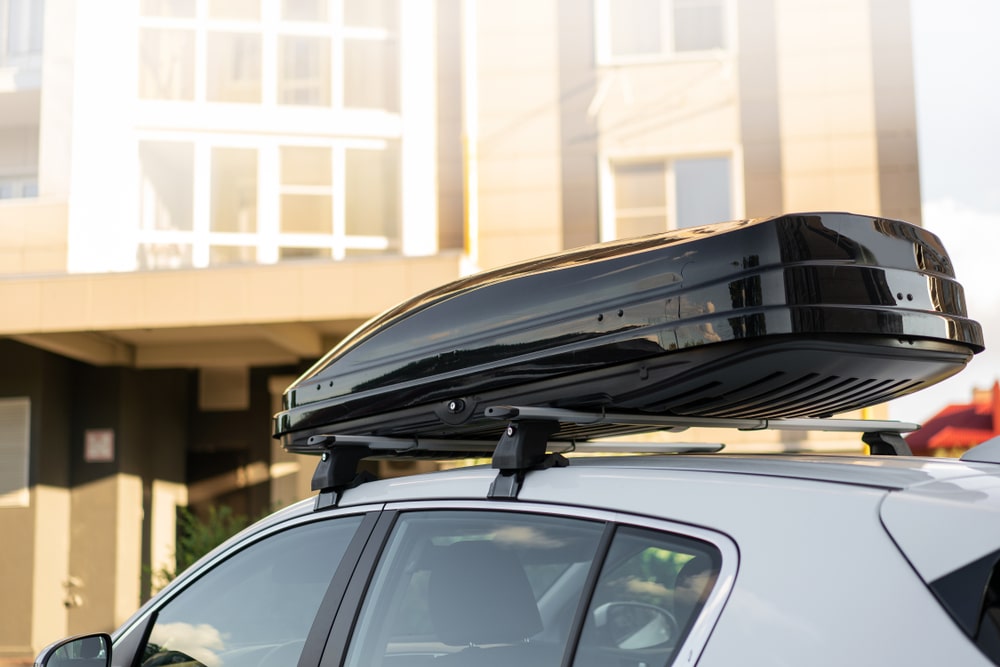
To install a Thule roof box, align it with the roof bars and secure it using the provided clamps or bolts. Ensure the box is centered and tightly fastened.
Thule roof boxes are a popular choice for expanding vehicle storage space. They offer a sleek design, durability, and ease of installation. These boxes are ideal for road trips, camping, and transporting bulky items. Proper installation is crucial for safety and performance.
Always consult the user manual for specific instructions. Make sure your roof bars are compatible with the Thule box model. Correctly installed, the box will stay secure at high speeds and in adverse weather conditions. Investing in a Thule roof box enhances your vehicle’s capacity and convenience, making it a valuable addition for any travel enthusiast.
Choosing The Right Thule Roof Box
Picking the right Thule roof box is crucial for a great trip. The right roof box ensures your items are safe and your car is balanced. Two key factors are vehicle compatibility and storage capacity.
Vehicle Compatibility
Your car must support the Thule roof box. Not all roof boxes fit every car. Check your car’s manual for roof load limits.
Use Thule’s fit guide to find a compatible roof box. The guide helps you match your car’s make and model. Always ensure the roof box mounts securely.
Here is a quick checklist for vehicle compatibility:
- Check roof load limits
- Use Thule’s fit guide
- Ensure secure mounting
Storage Capacity
Consider how much space you need. Thule offers various sizes. Small boxes are great for light travel. Large boxes suit big families and long trips.
Here is a size guide for Thule roof boxes:
| Box Size | Volume | Ideal For |
|---|---|---|
| Small | 300 Liters | Light travel |
| Medium | 400 Liters | Weekend trips |
| Large | 500 Liters | Family vacations |
Choose a size that fits your needs. It ensures you have enough space for all items.
Required Tools And Materials
Before you start installing your Thule roof box, gather all necessary tools and materials. This ensures a smooth installation process. Below, you will find a list of essential tools and additional accessories needed.
Essential Tools
- Wrench: A wrench is necessary for tightening bolts.
- Measuring Tape: Use a measuring tape to ensure proper placement.
- Screwdriver: A screwdriver helps secure the roof box brackets.
- Rubber Mallet: A rubber mallet assists in adjusting the roof box without damage.
Additional Accessories
- Protective Gloves: Wear gloves to protect your hands during installation.
- Anti-theft Locks: These provide extra security for your roof box.
- Step Ladder: A step ladder gives you better access to your car roof.
- Lubricant Spray: Use lubricant to ease the movement of hinges and bolts.
Having these tools and accessories ready will make the installation of your Thule roof box quick and easy.
Preparing Your Vehicle
Before installing a Thule roof box, your vehicle needs preparation. This ensures a secure and stable installation. Follow these steps to ready your car.
Cleaning The Roof
First, clean your vehicle’s roof. Use a mild detergent and water. Remove dirt, grime, and debris. A clean surface ensures better grip for the roof box. Dry the roof with a soft cloth. Avoid scratches and marks.
Inspecting Roof Rails
Inspect the roof rails for damage. Check for any bends or cracks. Ensure they are securely attached. Tighten any loose screws or bolts. Functional roof rails are critical for the roof box’s safety.
| Step | Action | Reason |
|---|---|---|
| 1 | Clean the roof | Ensures better grip |
| 2 | Inspect roof rails | Check for damage |
| 3 | Tighten loose screws | Ensure safety |
- Use mild detergent
- Dry the roof thoroughly
- Check roof rails for damage
- Tighten any loose parts
These steps make sure your vehicle is ready for a Thule roof box installation.

Credit: www.etrailer.com
Unboxing And Inspecting The Roof Box
Unboxing your new Thule Roof Box is an exciting moment. Ensure everything is in perfect condition by following these steps. This guide will help you to check for damage and review all components.
Checking For Damage
First, inspect the box exterior. Look for any signs of damage. Carefully cut the tape and open the box. Remove the roof box and place it on a flat surface.
Examine the roof box for scratches, dents, or cracks. Ensure the locking mechanisms and latches are intact. Pay close attention to the corners and edges.
Reviewing Components
Next, review all included components. Refer to the instruction manual for a complete list. Typically, you should find:
- Roof Box
- Mounting Brackets
- U-Bolts
- Locking Mechanisms
- Keys
- Instruction Manual
Lay out all components and check against the list. Ensure no items are missing or damaged. If any parts are missing, contact Thule customer service immediately.
Use the table below to verify the components:
| Component | Condition |
|---|---|
| Roof Box | Good |
| Mounting Brackets | Good |
| U-Bolts | Good |
| Locking Mechanisms | Good |
| Keys | Good |
| Instruction Manual | Good |
Double-check everything before proceeding with the installation. This will ensure a smooth and successful setup of your Thule Roof Box.
Mounting The Roof Box
Mounting a Thule Roof Box is simple if you know the steps. This guide will walk you through the process of positioning the box and securing the clamps. Follow these steps to ensure a secure and safe installation.
Positioning The Box
First, place the roof box on the car’s roof bars. Make sure the box is centered. This ensures even weight distribution. Check the distance from the front and rear edges. The box should not overhang too much. This helps with aerodynamics and safety.
| Step | Action |
|---|---|
| 1 | Lift the box onto the roof bars. |
| 2 | Center the box on the bars. |
| 3 | Check front and rear overhang. |
Securing The Clamps
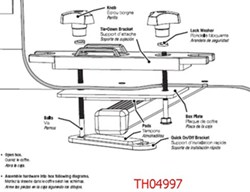
Next, you need to secure the clamps. Open the roof box. Locate the clamps inside. Align the clamps with the roof bars. Tighten the clamps by turning the knobs. Make sure they are snug. Check all clamps for tightness. This ensures the box is secure.
- Open the roof box.
- Locate the clamps inside the box.
- Align clamps with the roof bars.
- Tighten the clamps by turning the knobs.
- Check for tightness on all clamps.
Once the clamps are secure, close the box. Lock the box for safety. You are now ready to hit the road!

Credit: thesirshave.com
Balancing And Weight Distribution
Installing a Thule roof box is a great way to increase your vehicle’s storage space. But, balancing and weight distribution are crucial for safe and efficient use. Properly distributing the load inside your Thule roof box ensures stability and safety while driving.
Even Load Placement
Placing the load evenly inside the roof box is essential. Uneven loads can cause the car to sway. This can affect your control over the vehicle. Here are some tips for even load placement:
- Place heavier items in the center of the box.
- Distribute lighter items towards the edges.
- Ensure that the load is balanced from front to back.
- Avoid placing all heavy items on one side.
Weight Limits
Knowing the weight limits of your Thule roof box is important. Overloading can damage the roof box and your car. Refer to the Thule manual for specific weight limits. Here is a general guide:
| Thule Roof Box Model | Maximum Weight Limit |
|---|---|
| Thule Motion XT | 165 lbs (75 kg) |
| Thule Force XT | 110 lbs (50 kg) |
| Thule Vector | 165 lbs (75 kg) |
Always check your vehicle’s roof load capacity. Combine the weight of the roof box and the contents. Ensure it does not exceed the vehicle’s limit. This helps in maintaining safety and performance.
Testing And Final Adjustments
After installing your Thule Roof Box, you need to ensure everything is in place. This process involves a series of checks and adjustments. These steps guarantee that your roof box is secure and ready for the road.
Tightness Check
First, check the tightness of all mounting brackets and bolts. Use a wrench to ensure everything is snug. Loose bolts can make the roof box unstable. Stability is key for safety.
Inspect the alignment of the roof box. It should be centered on your car roof. Misalignment can affect driving dynamics. A simple visual check can help.
| Component | Action |
|---|---|
| Mounting Brackets | Use a wrench to tighten |
| Bolt Alignment | Ensure all bolts are in place |
| Roof Box Position | Check for center alignment |
Road Test
Now, it’s time for a road test. Drive your car at different speeds. This will help identify any unusual noises or vibrations.
- Start with a slow drive around your neighborhood.
- Gradually increase your speed to highway levels.
- Listen for any rattling sounds.
If you hear any noises, stop immediately. Recheck the tightness of all components. Repeat the road test until you are satisfied.
Finally, ensure the roof box does not affect your car’s handling. The car should feel stable during turns. If not, readjust the roof box and test again.
Maintenance And Storage Tips
Proper maintenance ensures your Thule Roof Box lasts long. These tips help keep it in top condition. Store it correctly to prevent any damage. Follow these simple steps to enjoy your roof box for years.
Regular Cleaning
Clean your Thule Roof Box after every use. Use mild soap and water. Avoid harsh chemicals or abrasive cleaners. Rinse thoroughly and dry with a soft cloth. Inspect for any damage or wear.
Check the mounting hardware regularly. Tighten screws and bolts if needed. Lubricate locks and hinges with silicone spray. Keep the roof box free from dust and debris.
Off-season Storage
Store your Thule Roof Box in a cool, dry place. Avoid direct sunlight and extreme temperatures. Remove all contents before storage. Place it on a flat surface to prevent warping.
Cover the roof box with a protective sheet. This keeps it free from dust and scratches. Inspect the box periodically. Check for any signs of damage or pests.
| Maintenance Task | Frequency |
|---|---|
| Clean with soap and water | After every use |
| Inspect for damage | Monthly |
| Lubricate locks and hinges | Every 3 months |
| Check mounting hardware | Before each trip |
Following these tips helps maintain your Thule Roof Box. Keep it clean, store it properly, and it will serve you well.

Credit: www.youtube.com
Frequently Asked Questions
How To Install A Thule Roof Box?
Installing a Thule roof box is simple. First, position it on your roof rack. Then, secure it using the provided clamps. Finally, ensure it’s tightly fastened to prevent movement.
Can I Fit A Thule Roof Box Myself?
Yes, you can fit a Thule roof box yourself. Follow the step-by-step instructions provided. Ensure it’s securely attached to your roof rack for safety.
What Tools Are Needed To Install Thule Roof Box?
You usually need no special tools to install a Thule roof box. Most Thule roof boxes come with all necessary mounting hardware included.
How Much Weight Can Thule Roof Boxes Hold?
Thule roof boxes can typically hold between 75 to 110 pounds. Check your specific model for exact weight limits and never exceed it.
Conclusion
Installing a Thule roof box enhances your travel experience by providing extra storage. It’s easy to install and secure. Follow the steps mentioned for a hassle-free setup. Enjoy more space and comfort on your next adventure. Invest in a Thule roof box for a practical and reliable storage solution.

